First Glassblowing

Making stuff with fire! Yeah! Woo!

I was up at the local Makerspace a few weeks months (?) ago and Ben asked if I wanted to go to the glassblowing workshop. He had George coming in for a couple of days and teaching a workshop. Since (was) it’s almost Halloween, the item du jour would be glass pumpkins. I’m a sucker for projects that happen at glowing red temperatures, so why not? She did a fantastic job running the program, by the way. Simultaneously exciting and safe. Lots of attention to keeping all of your fingerprints intact, and she has teaching this thing down to failure-proof.

Here’s the video:

And here’s the finished product:


Woo hoo! They’re doing this again in early December and I can’t recommend it enough – go!


Broken Kindle Screen Repair, yet I find myself now asking “Why?”

Chalk this up to some sort of compulsion to fix things instead of throwing them away. The scenario: I found myself owning a 3rd generation Kindle with a broken screen. At the time that the screen broke, replacement screens were about as expensive as just buying a new device. By the time you paid for shipping halfway around the world, getting a new one was a winner.

Fast forward about three years: I’m rooting around in a bunch of junk for some obscure reason and I come upon said Kindle, broken screen and all. A little Google-Fu and I find a replacement screen for $20. I don’t really know anything about the screen, but I go ahead and order it. While I’m waiting for it to arrive, I tear apart the old one. Rather than repeating the whole story, I’ll just provide a link to the teardown guide at iFixit. Behold, a pile of parts:

OLYMPUS DIGITAL CAMERA

Now to be certain, the new screen wasn’t truly new. It arrived with a page of text displayed on it (e-Paper will hold an image indefinitely even disconnected – that’s how it manages to use so little power). My guess is that it was pulled from a dead Kindle returned under warranty and shipped halfway around the world for repair. Maybe it made sense to repair them at the time. That would have been around 2012-2014. I can’t remember when it was that it got sat on.

Assembly is the reverse of the above steps:

OLYMPUS DIGITAL CAMERA

(That has a ton of lens distortion. Still, the little Olympus TG-2 is usually better than the iPhone 6S, except maybe in this case)

After a few minutes to charge back to a safe level, and a few more minutes as the device reboots from a totally cold start, up comes the Kindle UI and it’s ready to go. All the previous Young Adult fiction was safely in place, along with a good bit of Project Gutenberg texts (yay!). I have to figure out how to get the cheesy vampire novels off of there.

Well, deleting them assumes I’m going to use the thing. After the effort to fix it, and the $20 screen, I’m stuck with it. The problem I have with it is simple: it’s complete crap for reading PDFs. Every issue of Byte Magazine, for instance, is available as a PDF. The archive also has links for the ePub format, which is almost the native format for the device, but the files genuinely suck. The problem is how they’re made. When the magazines were scanned, the images were fed through optical character recognition. The OCR can’t tell the difference between article text and an advertisement, it often gets punctuation wrong, and it sometimes goes on on a tangent and doesn’t become human-readable again for a dozen pages. When they went to make the ePub files, they took the OCRed text and converted to ePub.

So I’m reminiscing with old issues of Byte in PDF, and the Kindle doesn’t cut it. Now what I can do is find interesting books to read. Project Gutenberg texts, for instance, are lovingly edited by hand. There are some textbooks, particularly for Computer Science topics, that are free. In theory, the Kindle can be used as some sort of obscenely oversize iPod. I think I’ll just keep the fourth generation iPod on hand, thank you.

So, the point of this exercise? Didn’t really have one. Maybe I’ll finish reading the introduction to Erlang that I have on there. But it works, darn it, and I only sank $20 into fixing it.

Silent Generator – completion

Silent Generator works.

Step 1: prepare the connector. If you can’t procure one of the connectors, and they’re probably proprietary, then you could carefully stuff some 1/4″ spade connectors into the connector on the back of the UPS. Probably. Might have to make a tool, or use a small screwdriver or something like that. But anyway, strip the wires, trim to length, and then attach the connectors.

Feel free to cringe, because I used connectors for the wrong size wire. I also soldered them instead of crimping, but since they were the wrong size they weren’t going to crimp right anyway, and then especially given that I used solid wire instead of stranded. Potential Fail all around.  But all is well that ends well, so:

Then all you have to do is wire it up (the long white wire connects the two deep cycle batteries in series to give the 24 volts that the UPS needs) and then connect the other end of the new cable to the batteries.

OLYMPUS DIGITAL CAMERA

And there you go. In initial testing it ran a 200W incandescent light bulb for ten hours before I got bored and turned it off. The batteries still had gobs of charge in them.

Speaking of charge – the UPS will recharge the batteries when the power comes back on. It’s a trickle charger and will take a couple of days to top them off, but it’ll do it. I think in a power outage it would be faster to unhook the batteries and do a quick, partial charge with jumper cables and a vehicle. There’s some anecdotal evidence that my Prius will provide 12V at about 40A, max, with the A/C and headlights turned off. The 201V battery in the trunk, and the engine-driven, three-phase alternator that charges it, can provide 21KW of power and requires a really big UPS as an inverter.

Speaking of “Silent” – it won’t be until you crack the UPS case open and remove/disable the beeper element. Otherwise you get a warning beep every 35 seconds or so, which is worse than listening to the generator.

Silent Generator – the Molex UPS power connector

The APC “Back-UPS RS-1500” UPS has an internal pair of batteries and a connector for an external pack to extend the runtime. The connector is (a) pretty big, and (b) not evidently something you can just go out and buy. Fortunately, I also had a totally dead identical UPS. The internal and external battery connectors are, mercifully, the same. So I just removed the dead built-in battery and snipped off the connector. There’s one on eBay right now for $15, so if you can’t get a second UPS then you could probably still get along.

OLYMPUS DIGITAL CAMERA

The connector on the right is the one you need, the one on the left is what you’ll encounter on the back of the UPS.

OLYMPUS DIGITAL CAMERA

From outside-edge-to-outside-edge, it’s 1.5 inches. The Molex part number is 870-1953A. That won’t match anything at Molex’s web site, or Newark for that matter. Google comes up dry… I suspect this is (semi-)custom for APC. The shape of the connector on the inside makes me think you could probably get away with 1/4″ spade lug connectors, but that makes me nervous thinking about it.

Anyway, paraphrasing John McClane, “Now I have the right connector. Ho ho ho!”

Silent Generator – Power Through Outages with a Big UPS

It seems like, between deregulation of utilities and global warming, the electrical service just isn’t as good as it was in the past. Four-day outages have become the New Normal when freezing rain comes. Of course, I bought a generator. It makes 3.5KW and is just enough to run the electric water heater, or practically all of the other appliances I have. Including, thank Spaghetti Monster, the coffee maker.

There are only two problems with the generator. The first is the storage problem. I have to keep 10 gallons of gas handy, and the stuff has a short shelf life these days. This means rotating the gas. Every couple of months I fill up the car off of the cans and then go out and fill the cans back up. Not the biggest deal, but a pain none the less. The second problem is having to do the bi-monthly generator test. I skipped that step for a while, and as soon as I needed the rig again, the carburetor had to be cleaned out. When I run the engine I always run it out of fuel before I put it up. Turns out, that isn’t good enough. You have to actually remove the float bowl, drain it, and dry it. That’s more trouble than I want to go to, so now I once again just run it every couple of months.

The second problem with the genny is the deafening roar. Now, this is where I could have been clever and gotten one of the inverter-type sets with a small, variable-speed engine. The alternator on those doesn’t even try to produce 60 hertz power, but instead the engine speed is matched to the load at the most efficient point. The strange-frequency power is rectified to DC and then passed through an inverter to turn it back into 60 hertz AC. Net result is a fairly quiet rig. They also seem to top out at about 1KW.

What I really want is a dead quiet way to power the essentials through moderate-length outages – maybe a few hours. We occasionally have these sorts of outages, though the big four-day dealies are just as common. What I really need, in other words, is a battery bank and a big honking inverter.

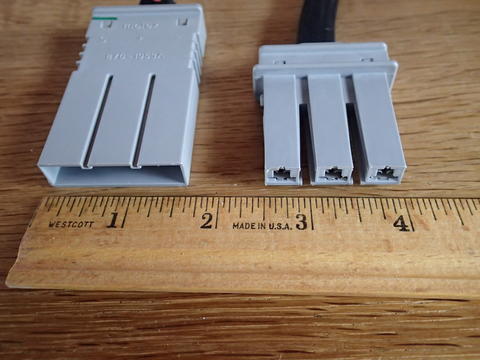
Cheap way to get a big honking inverter – score a dead uninterruptable power supply (UPS). The cheap ones, which is what I have, normally just pass the 120V line voltage through the unit while they tap just a little bit of power to charge a pair of small batteries. The batteries are typically 7 or 9 amp-hour gel cells, which are basically like motorcycle batteries. These batteries will eventually dry out and fail. When they do, it’s just about as cheap to replace the UPS as it is to fool with new batteries. Hence, there’s a good supply of these UPSes in the electronics recycling bins at the dump. I selected a 1.5 KVA model, though that rating is a bit ambitious. In really, it’ll provide 800 watts into a purely resistive load, like a light bulb. Or a coffee maker. Just sayin’.

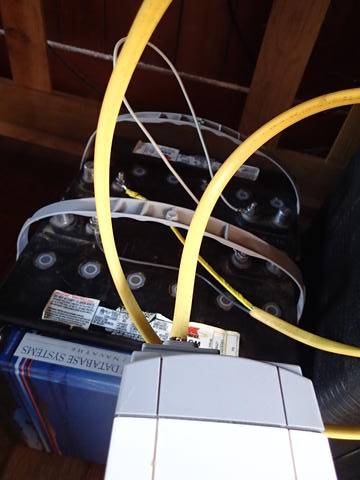
You ever notice those safety lights up in stairwells, the ones that switch on a couple of lamps when the power goes out? Turns out fire codes require them in commercial buildings. Something about not trying to evacuate a crowded building and suddenly having it go dark in the stairwell. Those safety lights use the same kind of batteries as a UPS.

No, I didn’t rob them out of the safety lights. What I did was wait until the health and safety guy came around and replaced the batteries. Again, fire codes are your friend. The batteries are required to be replaced every two years, well ahead of when they should fail. All you have to do is (a) be actually friendly with the guy and not be a jerk, and (b) offer to carry those heavy things so he doesn’t have to. Four stair wells, five floors, and now I have twenty of them. I also have the dregs of a spray can of fake smoke so I can test the smoke detectors without holding candle under them,. but that’s a whole separate thing. Thanks Safety Dude. You know who you are.

I use the gel cells for all kinds of stuff. They’ll run a boom box at a drive-in movie. They’ll run a small ham rig at field day (takes a few of them to run for 24 hours, but then again I have 20 of them, so…) and they’ll run a 12V RV fan while you’re on the air.

Some of the batteries are in better shape than others – I’m guessing the two year replacement cycle was determined empirically. So I tested some of them and found the two best ones. Test rig is a 12 volt, 50 watt incandescent bulb for RV use. This works out to just about 4 amps. I put the multimeter in series with it, set to measure amps, just so I could keep an eye on discharge. I left the thing glow for an hour or so just to satisfy myself that the batteries weren’t completely ready to fail.

So now I have a UPS that will just barely make one cup of coffee. Next step is to solve the runtime problem. Hint – this involves larger batteries.

OLYMPUS DIGITAL CAMERA

Exposure and white balance is totally blown – I used the small waterproof Olympus. It’s surprisingly good, but it isn’t perfect.

Making Loki’s Glow Stick of Destiny for Halloween

I can’t believe I didn’t post this about 5 months ago…

After Halloween quasi-cosplay as Tony Stark (stylish black T-Shirt and Arc Reactor) and as Phil Coulson (dark suit, dark tie, S.H.I.E.L.D. identification badge clip), it was time to give Loki a shot. The essence of the character is (a) tons of hair gel, (b) the sceptre, aka The Glow Stick of Destiny, and (c) Tom Hiddleston’s wit, charm, and sexy good looks.

So, two out of three ain’t bad.

The sceptre’s general shape is surprisingly close to that of an axe handle. The blade is your generic “this is a fantasy weapon with sharp bits and swoopy bits and it’s wildly, totally impractical for anything but being a movie prop, and we don’t care” aesthetic. In other words, I’ll freehand something out of thin plywood. Finally, there’s the small matter of the actual glowing crystal. Is it an Infinity Stone? A chunk of one? A magically / metaphysically charged symbol of Thanos’ grand ambition and utter evil? It looks cool, so really, who cares?

Off to the Big Box Home Improvement Store. Axe handle? Check. Spray paint? Yep. Infinity Stone? Maybe I can find a clerk.

Infinity Stone has been located, cleverly disguised as a drawer pull. Check and mate.

Back at the Secret Underground Laboratory, the process is pretty direct. Cut the threaded end off of the “crystal” drawer pull, grab a one dollar souvenir flashlight from the junk supply, and cut four layers of translucent blue plastic out of a Pendaflex-compatible folder label cover. Stack the filter material on top of the flashlight lens and then superglue the drawer pull to the top of the stack. Instant blue glowing crystal. Perfect.

OLYMPUS DIGITAL CAMERA

Ingredients, and Finished Dish

A little bit of bandsaw work on the “blade”, then spray paint the handle Rustoleum “Metallic Vintage Copper” and the blade “Metallic Matte Nickle”. Let dry, assemble (oh, yeah – drill the clearance hole for the flashlight first) and you’re ready to take on the Avengers. I decided to go with the “Loki at the Opera House” look (dark slacks, tie, and vest with a long coat, because I didn’t find an opera coat in any thrift stores around here). Add about four ounces of super extra hold hair gel, and I have the slicked-back aerodynamic look I was going for.

OLYMPUS DIGITAL CAMERA

Glow Stick o’ Destiny, with supplemental reading materials

After action report: Vintage Copper is too dark. I probably should spray it again with plain old gold. The scarf that Loki wears at the Opera House is essential to conveying the character. I felt like I looked the part of a nicely-dressed dude walking around with a glowing axe handle more than Thor’s mischievous adopted brother. And finally, I have to admit: Halloween is more fun in iambic meter.

OLYMPUS DIGITAL CAMERA

Seriously, if I worked out more and grew my hair some, I could so totally look like Hiddleston…

Also – getting a usable combination of (a) decent white balance with (b) not completely blown out bright areas is proving somewhat challenging on the waterproof camera, and the new WordPress editor really does suck.

Fluorescent Flashlight Repair

Pretty soon, I’m going to have to change the name of this place to “Secret Underground Flashlight Repair Center”, but whatever.

Symptom – approximately 20 year old combination fluorescent and incandescent flashlight suddenly loses the fluorescent side. Incandescent is fine. Try the obvious stuff – new batteries, fiddle with the switch a few times, remove and replace the fluorescent bulb a few times. No joy.

Disassemble, completely.

OLYMPUS DIGITAL CAMERA

Visual inspection: broken wire on the transformer. This shot is actually after desoldering two of the surviving connections…

OLYMPUS DIGITAL CAMERA

I hauled out the desoldering braid to completely and cleanly remove the transformer, then I soldered some bare copper wires (probably 28ga – salvaged out of an old PBX installation) to the leads. Reassembly is the reverse of takedown, but much, much more fiddly.  Once its finally back together, switch it on and it works.

OLYMPUS DIGITAL CAMERA

I really need to go back in there one more time and squirt a bunch of silicone to stabilize the wires and hold the transformer in place. It’s a miracle the transformer didn’t break loose before now. Roughly twenty years of rough handling finally caught up with it.

Real Life Pac Person

Real Life Pac Person debuted yesterday at the Burlington Mini Maker Faire. It must have been a big hit. 🙂  Rough numbers look like about 900 people played 350 games. A pure guess has them at 97% kids. Not too surprising – as adults we’re at high risk of forgetting how to play.

DSC_0032

The game construction has been covered a little bit already. Three-quarter circle capes were sewn from canvas. LEDs were sewn onto the capes: yellow LEDs on a yellow cape for the Pac Person, and blue LEDs plus either red or green LEDs onto the black capes worn by the ghosts. Ghosts then were equipped with a Raspberry Pi (complete with WiFi stick) for smarts, and a smaller accessory protoboard was made with the aforementioned voltage regulator and a pair of MOSFETs. These MOSFETs were used to turn individual strands of LEDs off and on.

Construction was intentionally crude – I have a covert social science agenda around how people learn about technology artifacts on first exposure and how they manipulate it to their ends. Making it intentionally crude and exposed leads to lots of good questions, and sets up an environment where it’s safe to make suggestions.

OLYMPUS DIGITAL CAMERA

Surprisingly, the rats nest of wiring holds up fine. Leaving the connectors on means there are places to disconnect things and plug in power supplies (to light the lights) or to probe the other side with a voltmeter (to show what the computer and the MOSFETs are doing).

Once you have the technology, you need masking tape. In this case, 180 yards of masking tape. Plus you’ll need a big space – setup was about 24 feet by 40 feet with an extension out to the side. This makes the play area sort of L-shaped. Not exactly faithful to the original game, but I think it makes it more fun. Being able to spread out and run is a good thing. Naturally, using blue painter’s tape makes the play area look a bit more faithful to the original.

Power Pills have been an issue since I started. I wanted to use some tall, skinny cabinets to hold a big battery, a junker laptop, and an easy button. The big problem has been a safety question – for one thing, I don’t someone running full-power into a hard structure in the middle of the game. Secondly, I need a lot of power to run the laptops for a whole day. I’m talking about car battery amounts of power. If that thing gets tipped over, I have a problem.

Solution: pink squares on the floor represent power pills, and when I see someone run over one then I press return on my laptop. The laptop is running a program that sends the network request to the ghosts each time I press return.

“Network request”, you say? Yes. Network protocol is HTTP over TCP/IP. Ghosts run the Apache web server, each network request is a GET request for a cgi program. The cgi program sends a unix signal (signal.h style) to a setuid executable that triggers the Pi’s GPIO pins. Software is a state machine that transitions between ghost states – body color, then blue, then flashing blue, then back to body color. At any point, a new cgi request can send a new signal that sends it back to the “I just turned blue” state and it keeps on chugging. Light timing is read from a configuration file (once per startup to save power-hungry flash accesses). Now that you mention it, yes I did tune game timings on-the-fly.

Some spectators were amused by being able to ssh into a ghost and tweak stuff on the fly. Or for that matter, ssh into a ghost and play Minecraft on there, while the game is running.

Powering a Raspberry Pi from a Battery Pack (AA batteries)

(Time Travel Alert – this happened a week ago. If you played Real Life Pac Person at the preview on the 18th, then you’ve seen this and more. If you’re playing in Burlington, NC on the 25th at Mini Maker Faire, then know that I may not have the blog caught up until Sunday)

If you’re using a Raspberry Pi for a wearable, then you have an acute power problem. The RasPi needs 5 volts at about half an amp, peak, when a USB wireless adapter is connected. Steady-state draw with a very light workload will be about 350 mA. Based on the performance curves from a reputable manufacturer of batteries (OK, “cells”), this is going to give you about 3 hours of battery life on a quiescent device and a little less if it’s busy. Add in as much as 110 mA for all the blue LEDs, and Houston, we’ve got a problem.

So, Nickle Metal Hydride (NiMH) is your friend. 2500 mA/hr off the shelf, no waiting.

But you didn’t think it was going to be that easy, did you? Of course not. Four of those cells will give you 4.8V. Technically, that’s not enough voltage. In practice, yes, it will work, especially if all of your USB devices have nice, broad safety margins. I don’t want to chance it. Also, the wire lights vendor lied: the blue strands are actually 12V devices (they claimed 5 volts, and I should have known better…) and need a good 11.0V to be bright enough. Given that, I’m stuck using ten NiMH AA cells or eight alkalines and a shorting jumper.

12 volts is enough to fire a Raspberry Pi into the asteroid belt, so it has to be stepped down. In Ye Olden Days, that would be with something like a 7805 regulator – an analog device that basically turns excess voltage into heat, and lots of it. Welcome to the twenty-first freaking century.  We now have the 78SR-5/2-C. This is a 5V switching regulator a little bit bigger than a postage stamp and having a sweet, sweet 2 amp current rating (twice the original 7805). Claimed efficiency is around 90%… what it draws in, it puts out. Not much heat at all. Bonus side effect – the wattage in is just about the same as the wattage out, so if you produce 5 volts at 1 amp, then it will load down a 10 volt battery stack at half an amp, give or take. Nice.

Here it is cobbled up on the breadboard for a fast checkout:

OLYMPUS DIGITAL CAMERA

Please ignore the cheeseball AM transmitter on the upper strip. That’s for a future revision of the game. 🙂